Photosynthesis and plants
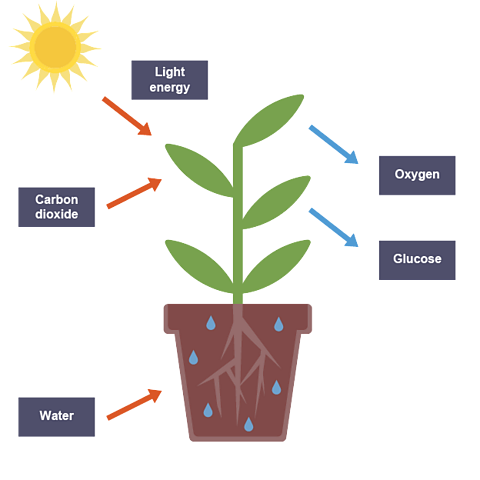
Photosynthesis is an When energy is taken in from the surroundings, this is called an endothermic reaction and usually feel cold. process that takes place in the chloroplasts (found in leaf cells).
Chloroplasts have a green pigment called The green chemical inside the chloroplasts of plant cells. It enables photosynthesis to take place., which absorbs light energy that reacts carbon dioxide and water together producing glucose (chemical energy) and oxygen.
The plant uses the glucose it produces for:
Respiration – to provide energy.
Storage – glucose is converted into starch and oils.
Photosynthesis balanced chemical and word equation
Leaf structure
Leaves are adapted for:
light absorption
gas exchange
Adaptations to maximise light absorption:
Waxy cuticle – a protective layer that is transparent to allow light to enter the leaf. It is waterproof to reduce water loss by evaporation.
Epidermis – physical defence layer that does not contain chloroplasts making it transparent so allows light into the leaf.
Palisade mesophyll layer – regularly shaped allowing many to pack together closely at the top of the leaf with many chloroplasts to increase photosynthesis.
Leaves are thin – ensures all cells receive light.
Leaves have a large surface area.
Each leaf is not shaded by another.
Adaptations to maximise gas exchange:
Spongy mesophyll – have very few chloroplasts and a large surface area to increase the diffusion of carbon dioxide and oxygen.
Intercellular air spaces – they allow the diffusion of gases through the leaf.
Stomata (small pores on the lower surface of the leaf) – allow gases to diffuse into and out of the leaf. Each stoma is surrounded by two guard cells that control its opening and closing. Stomata are usually open during the day and closed at night to reduce water lost.
Destarching a plant
- Before any photosynthesis practical, destarch the plant by keeping it in the dark for at least 48 hours to remove existing starch.
- This ensures that any starch detected afterward was produced during the experiment.
- Test a leaf for starch to confirm destarching; if iodine remains yellow-brown, all starch has been removed.
Investigating Photosynthesis
Biology is an evidence-based discipline where data is collected to test a An idea about how something works that can be tested using experiments.
If a plant has photosynthesised it will test positive for starch.
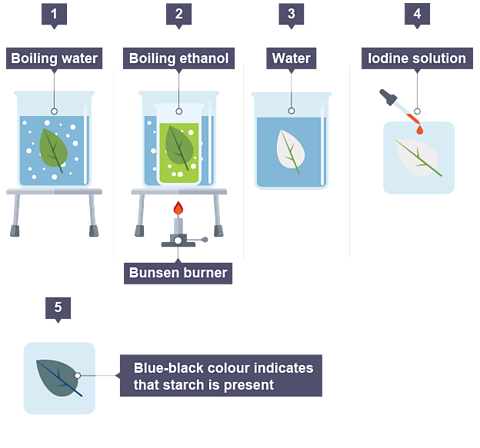
The starch test:
- Boil the leaf in water – this kills it, stopping any further chemical reactions.
- Turn off Bunsen burner – safely as ethanol is flammable.
- Boil the leaf in ethanol – removes the chlorophyll making the leaf turn white.
- Dip the leaf in water – this softens it.
- Spread the leaf onto a white tile and add iodine to test for the presence of starch.
Results:
| Starch | Colour change with iodine |
|---|---|
| Present | yellow-brown to blue-black |
| Absent | remain yellow-brown |
Safety:
As well as wearing goggles throughout the experiment, ensure that the ethanol is not exposed to a naked flame during step 2, as it is highly flammable.
Prescribed Practical B1
Investigating the need for light in photosynthesis
Procedure:
- Destarch a plant.
- Cover part of a leaf with lightproof paper/foil.
- Place the plant in bright light for several hours.
- Add iodine to test the leaf for starch.
Results:
Conclusion:
Only the parts of a leaf exposed to light will photosynthesise and produce starch, showing that light is necessary for photosynthesis.
Investigating the need for chlorophyll in photosynthesis
Procedure:
- Destarch a variegated plant – partly green and partly white.
- Place the plant in bright light for several hours.
- Add iodine to test the leaf for starch.
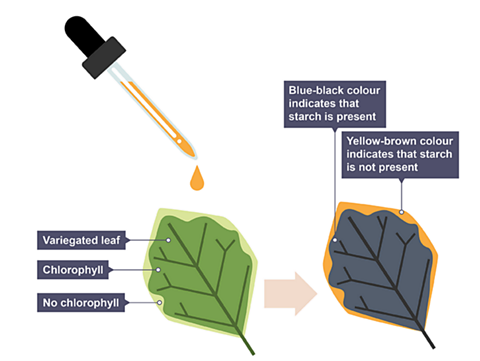
Conclusion:
Only the areas of the leaf that contained chlorophyll (the green parts) will photosynthesise and therefore test positive for starch, showing that chlorophyll is necessary for photosynthesis.
Investigating the need for carbon dioxide in photosynthesis
Procedure:
- destarch a plant
- expose one leaf to sodium hydroxide, which will absorb carbon dioxide from the surrounding air
- expose another leaf to water (control experiment for comparison), which will not absorb carbon dioxide from the surrounding air
- place the plant in bright light for several hours
- add iodine to test both leaves for starch
Results:
| Leaf | Colour after iodine solution |
|---|---|
| A | Blue – Black |
| B | Yellow – Brown |
Conclusion:
- leaf A, which receives CO₂, can photosynthesise and produce starch
- leaf B has no starch as it can't photosynthesise because sodium hydroxide absorbs its CO₂
- this demonstrates that CO₂ is essential for photosynthesis
Investigating the production of oxygen
Procedure:
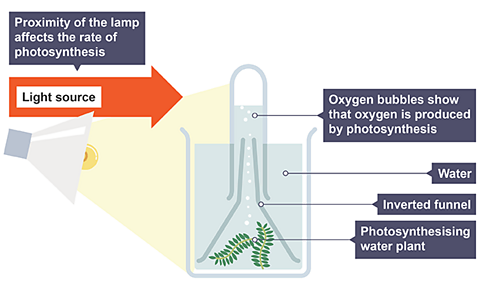
- place pondweed into a beaker of water
- add sodium hydrogen carbonate (gives carbon dioxide)
- cover with funnel and test-tube
- place light at set distance from the plant
- record the number of bubbles produced in one minute
Results:
| Distance of light / cm | Number of bubbles |
|---|---|
| 20 | 31 |
| 40 | 30 |
| 60 | 18 |
| 80 | 9 |
| 100 | 2 |
Conclusion
The closer the light, the greater the rate of photosynthesis as the number of oxygen bubbles increases up to 40cm where the rate is limited by temperature or carbon dioxide concentration.
Improvements
Measure the volume of oxygen produced as is more accurate than counting the bubbles of oxygen produced.
An oxygen electrode connected to a data logger can be used to measure the change in oxygen concentration.
Limiting factors
The factors that affect the rate of photosynthesis are:
- temperature
- light intensity
- carbon dioxide concentration
For photosynthesis to occur at its maximum rate, all factors must be at optimal levels. If any factor is in short supply, the rate of photosynthesis will be limited.
These factors are then limiting factors and the rate of photosynthesis will be determined by the factor that is in shortest supply.
Temperature
Temperature affects all reactions because an increase in temperature causes the molecules to gain kinetic energy and therefore increases chance of collisions.
At low temperatures, the rate of photosynthesis is limited by the number of collisions between enzymes and substrates. At high temperatures, enzymes are When an enzyme is denatured, its normal three-dimensional structure, especially the active site, is disrupted, causing it to lose its function and ability to catalyse reactions..
Light
As light intensity increases, the rate of photosynthesis increases until a certain point where the graph levels off.
At lower light intensities, light is the limiting factor because an increase in light causes an increase in photosynthesis.
At higher light intensities (plateau of graph), further increasing the light intensity does not increase the rate of photosynthesis meaning that another factor (either temperature or carbon dioxide concentrations) is limiting the rate of photosynthesis.
On a hot day, photosynthesis happens at a higher rate when compared to the cooler day, showing that temperature has an effect and is the limiting factor on a cooler day.
Carbon dioxide
As carbon dioxide concentrations increase, so too does the rate of photosynthesis until a certain point where the graph levels off.
At lower carbon dioxide concentrations carbon dioxide is the limiting factor because an increase in carbon dioxide causes an increase in photosynthesis.
At higher carbon dioxide concentrations (plateau of graph), further increasing the carbon dioxide concentration does not increase the rate of photosynthesis meaning another factor (either temperature or light intensity) is limiting the rate of photosynthesis.
An increased level of carbon dioxide leads to a higher rate of photosynthesis when compared to the lower carbon dioxide level.
This shows that the carbon dioxide level has an effect and is now limiting the rate of photosynthesis.
Photosynthesis and respiration
Hydrogencarbonate indicator
A A pH indicator used in photosynthesis and respiration experiments to visually show the concentration of carbon dioxide in a solution, changing color based on the CO2 levels. can detect increases and decreases in carbon dioxide concentration by changing colour:
| Level of carbon dioxide | Hydrogencarbonate colour |
|---|---|
| High | Yellow |
| Normal | Red |
| Low | Purple |
Photosynthesis only happens in the light. Respiration happens all the time.
In bright light
Both photosynthesis and respiration are occurring, but as the rate of photosynthesis is higher than the rate of respiration, the plant takes carbon dioxide in.
The removal of carbon dioxide from air would change the indicator from red to purple.
In low light.
When light intensity is low, the rates of photosynthesis and respiration are equal. This is known as the compensation point and there is no net gas exchange.
No net gas exchange would cause the hydrogencarbonate to remain red because no change in carbon dioxide concentration will be detected.
In the dark.
Only respiration is occurring as there is no light for photosynthesis, therefore the plant gives out carbon dioxide.
The release of carbon dioxide from the leaf into the hydrogencarbonate indicator changes the indicator from red to yellow.
Test your knowledge
More on Living processes
Find out more by working through a topic
- count2 of 5
- count3 of 5
- count5 of 5